This spring Collage Your World member Jeanne-Sylvie Bellet (France) sent me a beautiful mixed media piece in exchange for a copy of my collage zine. When she mailed it to me, I noticed that it was enclosed in an unusually colourful envelope. Upon further inspection and enquiry, I discovered that it was a handmade envelope! I was so impressed with it that I asked her if she would forward the template to me so I could make one of my own! Since then I’ve been enjoying making my own envelopes and am excited by the collaging challenges* it presents. You can send your envelope through the mail or hand deliver it to a special friend – whichever the case, they’ll be delighted by your efforts!
While surfing the internet, I discovered many envelope templates I could download. I also found a store called The Papery that sells plastic envelope templates here in Ottawa. Despite finding these, I still feel that Jeanne-Sylvie’s is the easiest one to make! So I’m going to pass it along to you…
Six Steps to Making Your Collaged Envelope…
Supplies:
Steel-edge ruler
Bone folder (optional)
Scissors and exacto knife
Clear packing tape or matte scotch tape and thin double-sided tape
Collage papers and magazine bits
Optional: stickers, decorative tape, rubber stamps, Stazon ink
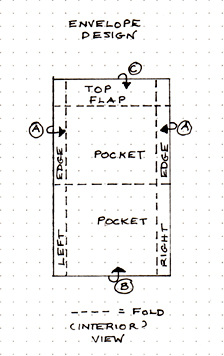
Note: Also see my diagram (below) and my samples to help you.
1 With your exacto knife, cut out a whole page from a magazine. Choose a page that might look interesting folded. Ones that have patterns and textures on them work well; ones that have people in them are cool, too. If you intend to mail your envelope, I suggest choosing a page from a magazine with thickish glossy pages. If you’re not mailing your envelope, use a sturdy magazine paper.
2 Place your page vertically and fold the left and right edges of your sheet inwards… perhaps a quarter of an inch or more. How much you fold your edges depends on the width of the letter or card you want to insert; so test it to see if it fits before you finish your envelope! To get a nice folded edge, fold over with a steel-edge ruler or score the page with a bone folder and then fold. Rub over the folds with a bone folder or your finger nail to flatten the fold.
If your page is not wide enough to contain your letter/card, you can add part of another page onto it to increase the width. Stick the two pages together (back and front) with packing or scotch tape.
3 Fold the bottom of your sheet upwards to create a pocket big enough to hold your letter/card. Remember to leave enough room at the top to fold a flap downward to close your envelope.
4 Unfold your envelope (except the left and right edges), turn it over and decorate the other side. This will be the outside of your envelope. You can embellish it with: magazine fragments, decorative papers, stickers, decorative tape… if you like, rubber stamp it with Stazon ink! (Most other inks will not dry on magazine paper.)
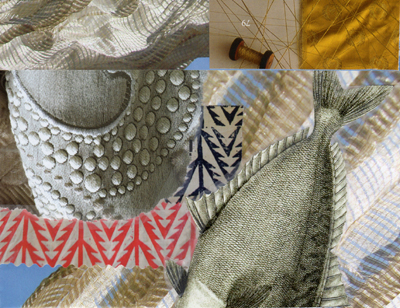
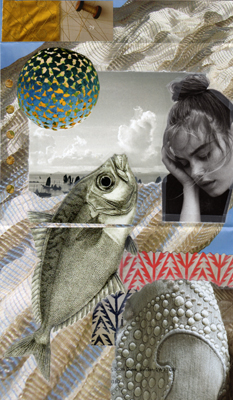
While decorating, keep in mind the areas where you’ll be placing your return and mailing addresses as well as your postage stamps. You can hand write your addresses in permanent marker (ie. Micron pen, Sharpie). I like to print out addresses on labels with my label maker because they stand out well for the postal service. At this stage you can be as creative as you like by strategically composing your design so it’s visually compelling. My sample (above) turned into an aquatic theme because the base page that formed my envelope had an image of fish net on it. This also inspired my sea-themed scanned note paper (below).
For those of you who feel challenged enough just putting the envelope together and don’t want to collage on it, no worries! If you’ve picked an interesting page … it will look simple and super, too. You need only stick on your address labels and stamps when you’re done … so skip the next step and proceed to 6.
5 When you’re ready to stick the images on your envelope, if you’re using glossy paper, I suggest you use packing tape or matte scotch tape to adhere the images. You can use double-sided tape where needed as well. I don’t recommend using glue stick because it doesn’t adhere well to glossy surfaces. These thicker tapes will make your envelope more durable and a bit waterproof.
6 When you’re ready to refold and finish off your envelope, adhere the left and right edges that form your envelope pocket together with double-sided tape. Make sure the tape is the exact size of your seam and not wider or you might lose some width if it is and your letter/card (depending on the size) might not fit by a fraction of an inch! So trim your double-sided tape if you need to. Once you’ve inserted your letter/card, you can seal the envelope with decorative tape. If you’re not sure if your tape is strong enough to withstand the mail service, reinforce it with some scotch tape in places.
And there you have it! Or as Jeanne-Sylvie might say in French: Voilà! – your own custom-made collage envelope! Bonne chance (good luck) making yours! If you do, I’d love to know how it goes. If you need more details about the how-to’s, I’m just an email away! Un grand merci pour cette merveilleuse idée, Jeanne-Sylvie!
Note: I must add that while two of Jeanne-Sylvie’s envelopes made it to me from Europe, for some reason, the one I sent her was returned to me!!! I’m in the midst of finding out why and will update you soon!
Other Related Links:
My New Collage Stationary!
Collage Your World Zine: L’invisible/The Invisible


Hello Michelle, what a great tutorial you did!!And your sea-themed envelope is a pure wonder!!Clin d’oeil de France et amitiés.
Hi Jeanne-Sylvie, Oh, I’m so glad you approve! 🙂 Thanks so much … you are my inspiration! Have a wonderful week. hugs Michelle